Filebeat Basic
简介
Filebeat附带预构建的模块,这些模块包含收集、解析、充实和可视化各种日志文件格式数据所需的配置,每个Filebeat模块由一个或多个文件集组成,这些文件集包含摄取节点管道、Elasticsearch模板、Filebeat勘探者配置和Kibana仪表盘。
Filebeat模块很好的入门,它是轻量级单用途的日志收集工具,用于在没有安装java的服务器上专门收集日志,可以将日志转发到logstash、elasticsearch或redis等场景中进行下一步处理。
来自官方简介翻译。。。
Filebeat和Logstash相比,前者占用内存相对较少:
cat /proc/`ps -ef |  grep -v grep |   grep logstash  | awk '{print $2}'`/status | grep -i vm
cat /proc/`ps -ef |  grep -v grep |   grep filebeat  | awk '{print $2}'`/status | grep -i vm
配置文件
filebeat的配置文件是filebeat.yml, 目录中附带有其示例配置文件filebeat.yml
filebeat.inputs:
- type: log
  enabled: true
  paths:
    - /var/log/*.log

#----------------------------- Elasticsearch:output(可选) --------------------------------
output.logstash:
  hosts: ["127.0.0.1:5044"]
output.elasticsearch:
  hosts: ["myEShost:9200"]
#----------------------------- Logstash output(可选) --------------------------------
output.logstash:
  hosts: ["127.0.0.1:5044"]
#----------如果Kibana Elasticsearch在同一主机上运行(可选)----------
setup.kibana:
  host: "mykibanahost:5601"
#----------------------------- Kafka output(可选) --------------------------------
output.kafka:
  # initial brokers for reading cluster metadata
  hosts: ["kafka1:9092", "kafka2:9092", "kafka3:9092"]

  # message topic selection + partitioning
  topic: '%{[fields.log_topic]}'
  partition.round_robin:
    reachable_only: false

  required_acks: 1
  compression: gzip
  max_message_bytes: 1000000
其配置文件有如下配置段:
[root@agou filebeat-7.7.1-linux-x86_64]\# egrep "^#==" filebeat.yml
#=========================== Filebeat inputs =============================
#============================= Filebeat modules ===============================
#==================== Elasticsearch template setting ==========================
#================================ General =====================================
#============================== Dashboards =====================================
#============================== Kibana =====================================
#============================= Elastic Cloud ==================================
#================================ Outputs =====================================
#================================ Processors =====================================
#================================ Logging =====================================
#============================== X-Pack Monitoring ===============================
#================================= Migration ==================================
简单使用 - 收集日志到本地
收集nginx日志到本地:
# vim /usr/local/filebeat-7.7.1-linux-x86_64/filebeat.yml
filebeat.inputs:
- type: log
  paths:
    - /var/log/nginx/access.log
    - /var/log/yum.log
- type: log
  paths:
    - /var/log/message

output.file:
  enabled: true     # default: true
  path: "/tmp/filebeat"
  filename: filebeat.txt
  #rotate_every_kb: 10000       # 日志分割大小
  #number_of_files: 7       # 文件保存路径下的最大数量,当文件数目超出该值时,最旧的文件将会被删除,该值应该介于2-1024之间,默认为7
  #permissions: 0600        # 文件权限
查看生成的本地文件:
[root@agou tmp]\# cat filebeat/filebeat.txt
{"@timestamp":"2020-07-10T23:47:33.886Z","@metadata":{"beat":"filebeat","type":"_doc","version":"7.7.1"},"log":{"file":{"path":"/var/log/n
ginx/access.log"},"offset":1360},"message":"::1 - - [11/Jul/2020:07:47:24 +0800] \"GET / HTTP/1.1\" 200 4833 \"-\" \"curl/7.29.0\" \"-\"",
"input":{"type":"log"},"ecs":{"version":"1.5.0"},"host":{"containerized":false,"ip":["172.16.1.131","fe80::20c:29ff:fe01:b93c"],"mac":["00
:0c:29:01:b9:3c"],"hostname":"agou","architecture":"x86_64","os":{"version":"7 (Core)","family":"redhat","name":"CentOS Linux","kernel":"3
.10.0-1127.13.1.el7.x86_64","codename":"Core","platform":"centos"},"name":"agou","id":"84a3254a0df34b59a4d62c5a4f90cb09"},"agent":{"type":
"filebeat","ephemeral_id":"d34e6811-1dc0-4597-ac02-8b1fb98c79ba","hostname":"agou","id":"315c67f4-2edd-46f1-8c77-1895cbe383ff","version":"
7.7.1"}}
...
收集到 ES(通过Logstash)
# vim /usr/local/filebeat-7.7.1-linux-x86_64/filebeat.yml
filebeat.inputs:
- type: log
  paths:
    - /var/log/nginx/access.log
    - /var/log/yum.log
- type: log
  paths:
    - /var/log/message
#----------------------------- Logstash output --------------------------------
output.logstash:
  # The Logstash hosts
  hosts: ["172.16.1.131:5044"]
配置 Logstash 到 ES
# vim beat2es.conf
input {
  beats {
    port => 5044
  }
}

output {
  elasticsearch {
    hosts => ["http://172.16.1.131:9200"]
    index => "%{[@metadata][beat]}-%{[@metadata][version]}-%{+YYYY.MM.dd}"
  }
}
以此启动ES、Logstash以及filebeat:
bin/elasticsearch -d
bin/logstash -f conf/beat2es.conf
./filebeat
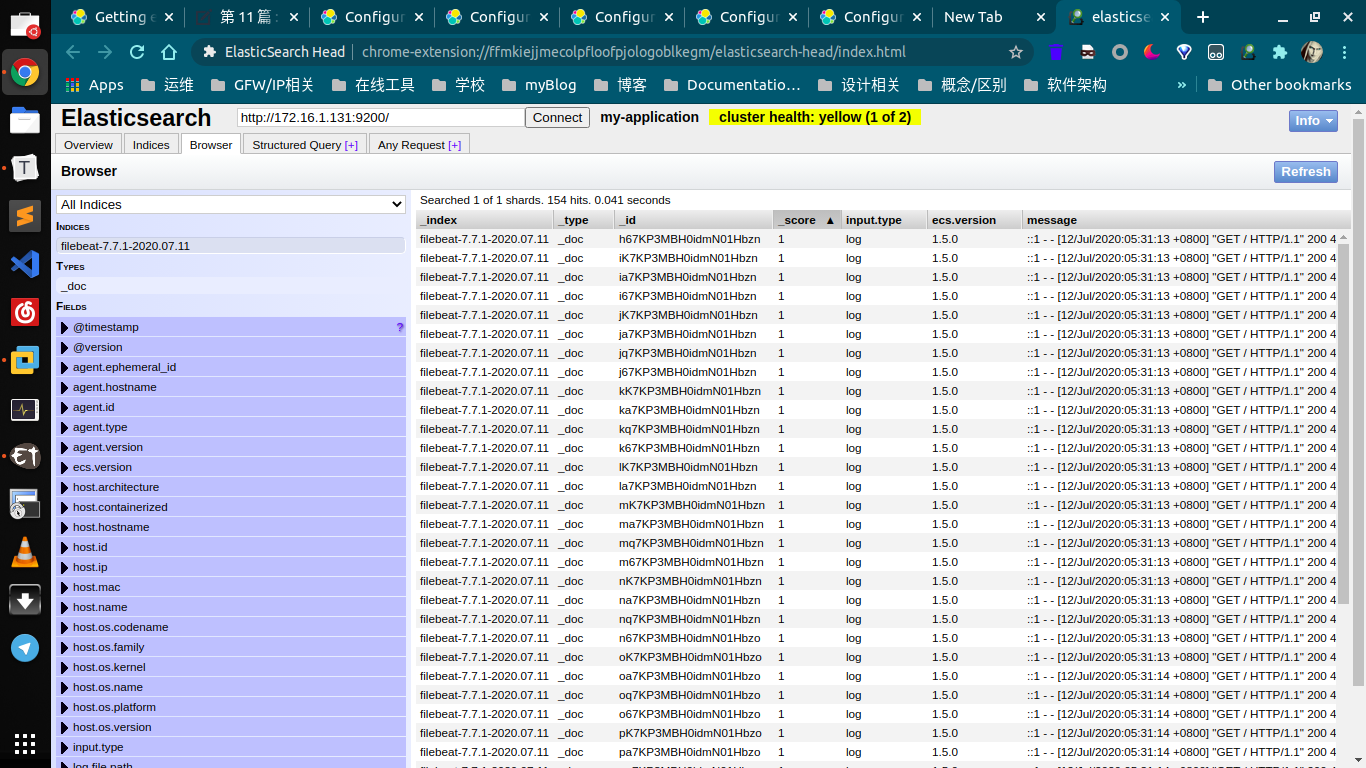
打开浏览器的ES插件,然后连接上主机的ES,点击Browser进行查看:

输出到 Redis
# vim /usr/local/filebeat-7.7.1-linux-x86_64/filebeat.yml
filebeat.inputs:
...

output.redis:
  hosts: ["localhost"]
  password: "my_password"
  key: "filebeat"
  db: 0
  timeout: 5


#output.file:
#  enabled: true        # default: true
#  path: "/tmp/filebeat"
#  filename: filebeat.txt
登录Redis主机查看:
127.0.0.1:6379> KEYS *
1) "filebeat"
# 查看一条数据
127.0.0.1:6379> LPOP filebeat
"{\"@timestamp\":\"2020-07-11T21:40:42.939Z\",\"@metadata\":{\"beat\":\"filebeat\",\"type\":\"_doc\",\"version\":\"7.7.1\"},\"input\":{\"t
ype\":\"log\"},\"ecs\":{\"version\":\"1.5.0\"},\"host\":{\"containerized\":false,\"ip\":[\"172.16.1.131\",\"fe80::20c:29ff:fe01:b93c\"],\"
mac\":[\"00:0c:29:01:b9:3c\"],\"name\":\"agou\",\"hostname\":\"agou\",\"architecture\":\"x86_64\",\"os\":{\"platform\":\"centos\",\"versio
n\":\"7 (Core)\",\"family\":\"redhat\",\"name\":\"CentOS Linux\",\"kernel\":\"3.10.0-1127.13.1.el7.x86_64\",\"codename\":\"Core\"},\"id\":
\"84a3254a0df34b59a4d62c5a4f90cb09\"},\"agent\":{\"type\":\"filebeat\",\"ephemeral_id\":\"63731e5e-da81-4b88-a390-01e4ce8d66aa\",\"hostnam
e\":\"agou\",\"id\":\"315c67f4-2edd-46f1-8c77-1895cbe383ff\",\"version\":\"7.7.1\"},\"log\":{\"offset\":14932,\"file\":{\"path\":\"/var/lo
g/yum.log\"}},\"message\":\"Jul 12 05:37:08 Installed: jemalloc-3.6.0-1.el7.x86_64\"}"
使用 Logstash将redis中收到的数据输出到ES中去:
# vim config/redis2es.conf
input {
  redis {
    host => "localhost"
    port => "6379"
    db => "0"
    key => "filebeat"
    data_type => "list"
    # password => "zls"
    codec  => "json"
 }
}

output {
    elasticsearch {
      hosts => ["172.16.1.131:9200"]
      index => "%{type}-%{+YYYY.MM.dd}"
  }
}
最后打开浏览器的ES插件进行查看,步骤同上所示。
参考链接
- Filebeat Documentation: https://www.elastic.co/guide/en/beats/filebeat/current/filebeat-getting-started.html
- filebeat-configuration: https://www.elastic.co/guide/en/beats/filebeat/current/filebeat-configuration.html
- input: https://www.elastic.co/guide/en/beats/filebeat/7.7/configuring-input.html
- output: https://www.elastic.co/guide/en/beats/filebeat/7.7/configuring-output.html
- 使用Filebeat收集日志: http://www.sunrisenan.com/docs/elkstack/elkstart11.html
- https://www.elastic.co/guide/en/beats/filebeat/7.7/multiline-examples.html